Cloudflare (Using D1 Database)
Learn how to deploy your project to the Cloudflare Workers platform with D1 database
This guide will help you deploy your mksaas project to the Cloudflare Workers platform with D1 database.
Important: Use the cloudflare-d1 Branch
Deploying to Cloudflare Workers requires using the cloudflare-d1 branch instead of the main branch. This branch contains the necessary OpenNext.js configuration and Cloudflare-specific adaptations, and uses D1 database by default.
If you want to use Postgres type database, please refer to Cloudflare Deployment.
Prerequisites
Before deploying your project to Cloudflare Workers, make sure you have:
- A Git repository containing your project code (like GitHub)
- A Cloudflare account, sign up here if you don't have one
Note on Worker Size Limits
The size limit of a Cloudflare Worker is 3 MiB on the Workers Free plan, and 10 MiB on the Workers Paid plan. After building your Worker, wrangler will show both the original and compressed sizes:
Total Upload: 13833.20 KiB / gzip: 2295.89 KiBOnly the latter (compressed size) matters for the Worker size limit, so if your project is larger than 3 MiB, you need to subscribe to the Workers Paid plan.
Deployment Steps
Switch to the cloudflare-d1 Branch
Clone the cloudflare-d1 branch of the MkSaaS template repository, and push the code to your new GitHub repository:
# Clone the cloudflare-d1 branch of the MkSaaS template repository
git clone -b cloudflare-d1 https://github.com/MkSaaSHQ/mksaas-template.git <your-project-name>
cd <your-project-name>

# Add the upstream repository and fetch the latest changes
git remote add upstream https://github.com/MkSaaSHQ/mksaas-template.git
git fetch upstream

# Remove the origin repository and add your new GitHub repository
git remote remove origin
git remote add origin <your-repository-url>

# Rename the branch to main and push the changes to the origin repository
git branch -M main
git push -u origin main
Install Wrangler CLI
Install the Wrangler CLI, and then run wrangler login to login to your Cloudflare account.
pnpm install -g wrangler

# Login to your Cloudflare account
wrangler login
Set project name
Set the name in wrangler.jsonc file to your project name:
{
  "name": "YOUR-PROJECT-NAME"
}
Create D1 Database
- Go to the Cloudflare Dashboard
- Navigate to
Storage & Databases→D1 Databases - Click
Create database - Enter a database name (e.g.,
mksaas-demo) - Select the database location (recommend choosing the region closest to your users)
- Click
Createto create the database
After creation, note down the Database ID, which you'll need for the next configuration step.
Configure D1 Database Binding
Add D1 database configuration to the wrangler.jsonc file:
{
  "name": "YOUR-PROJECT-NAME",
  "d1_databases": [
    {
      "binding": "DB",
      "database_name": "YOUR_DATABASE_NAME_HERE",
      "database_id": "YOUR_DATABASE_ID_HERE"
    }
  ]
}
Replace database_name with your created database name, and replace database_id with the newly created database ID.
Configure Environment Variables
Set up your environment variables for both development and production:
-
For development: Copy the example files and configure them
cp env.example .env cp dev.vars.example .dev.vars -
Configure variables: Follow the Environment Setup Guide to set up all required environment variables in
.envfiles, and leave.dev.varsas it is for now.
When using D1 database, you need to pay attention to the following environment variable configurations:
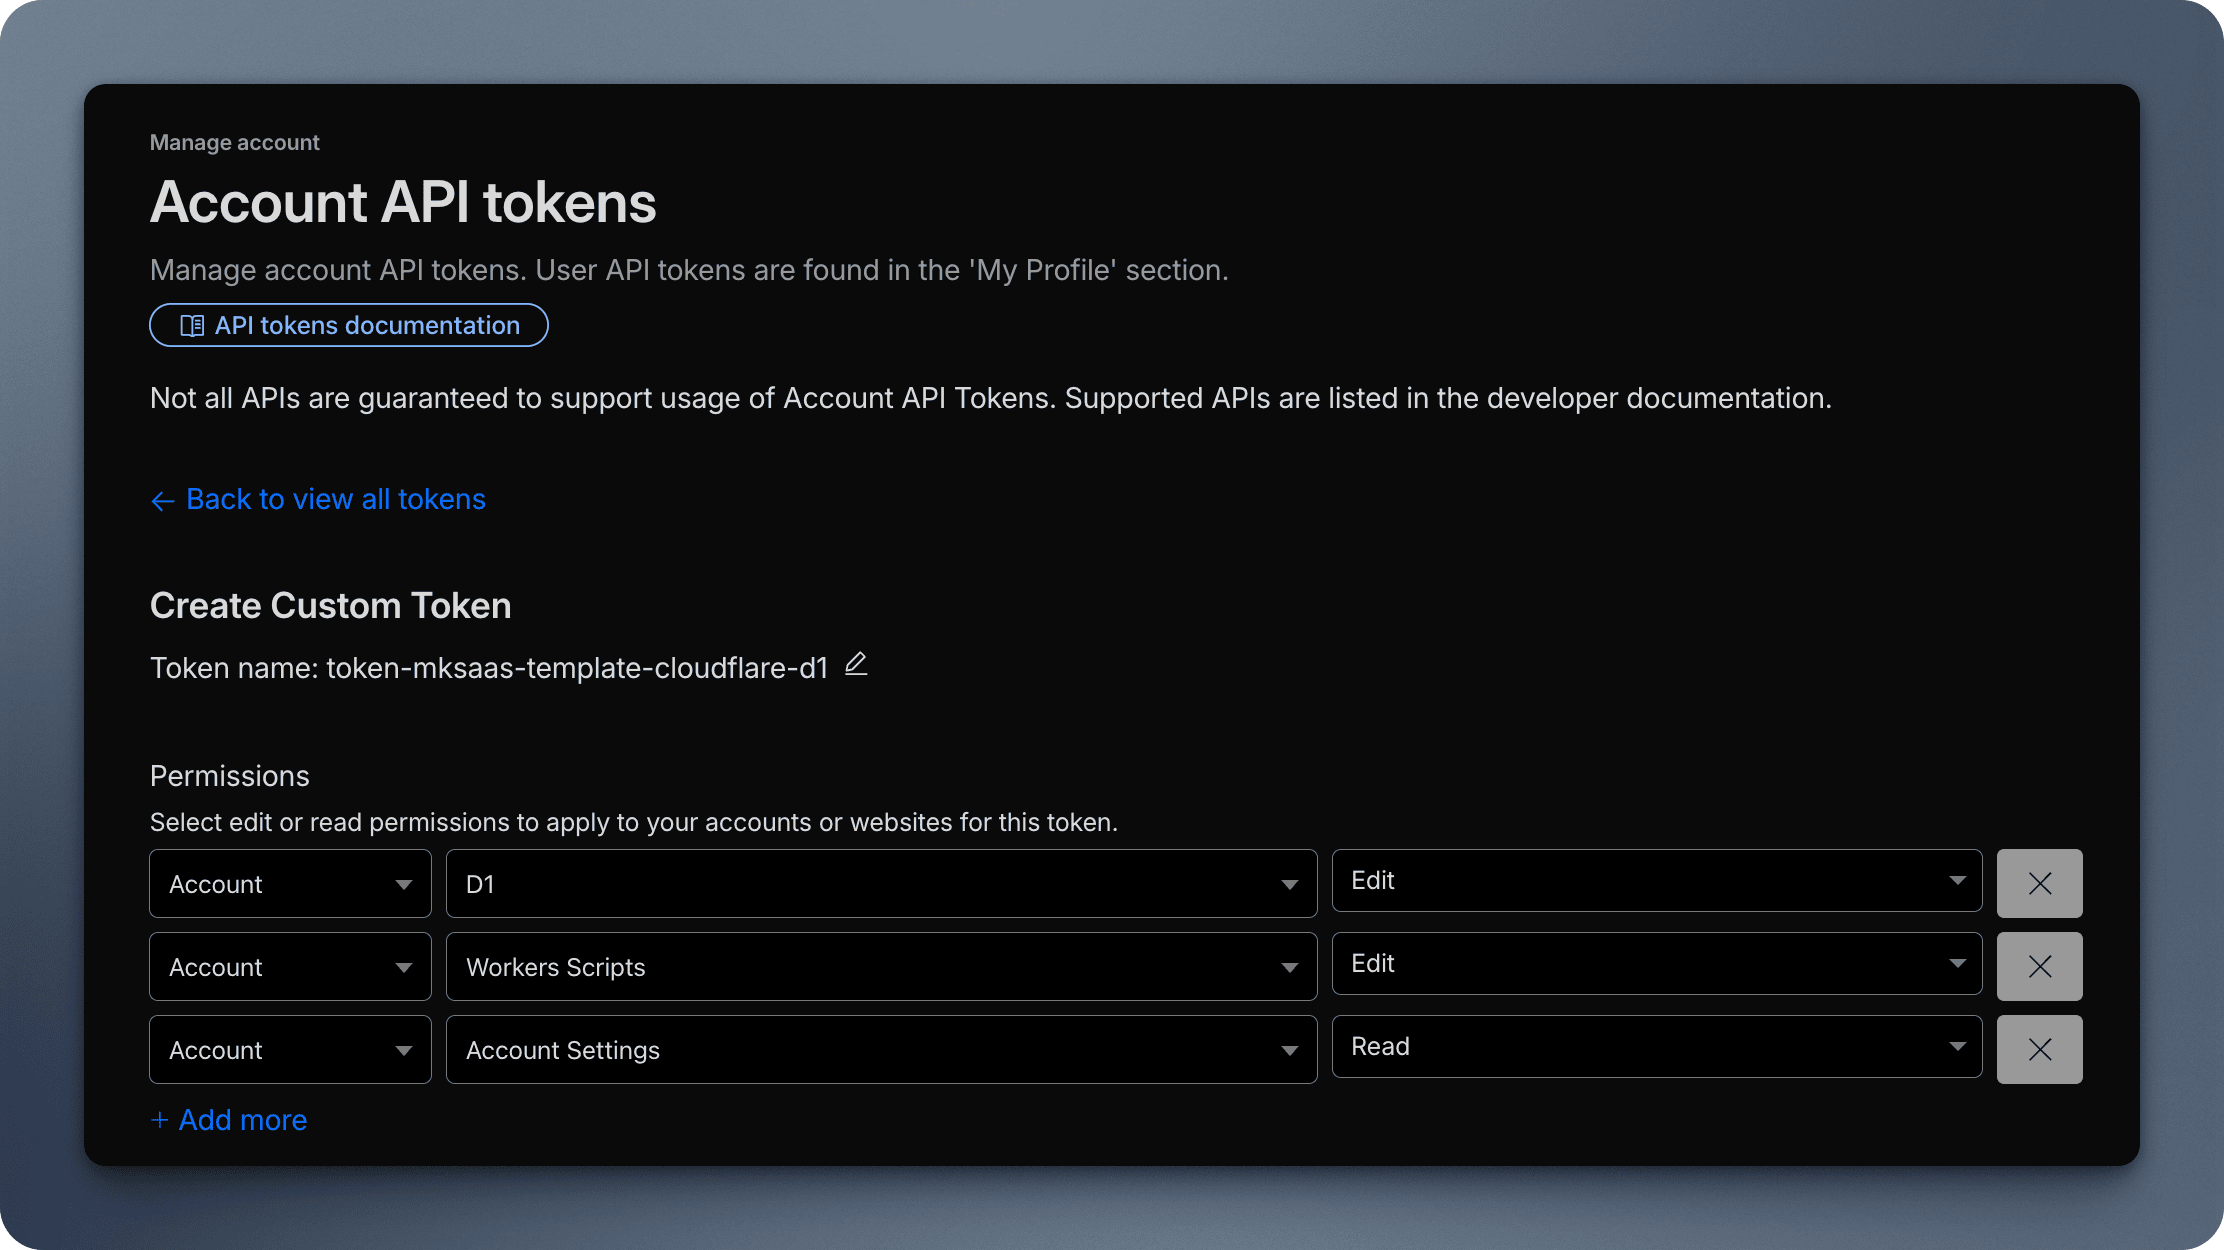
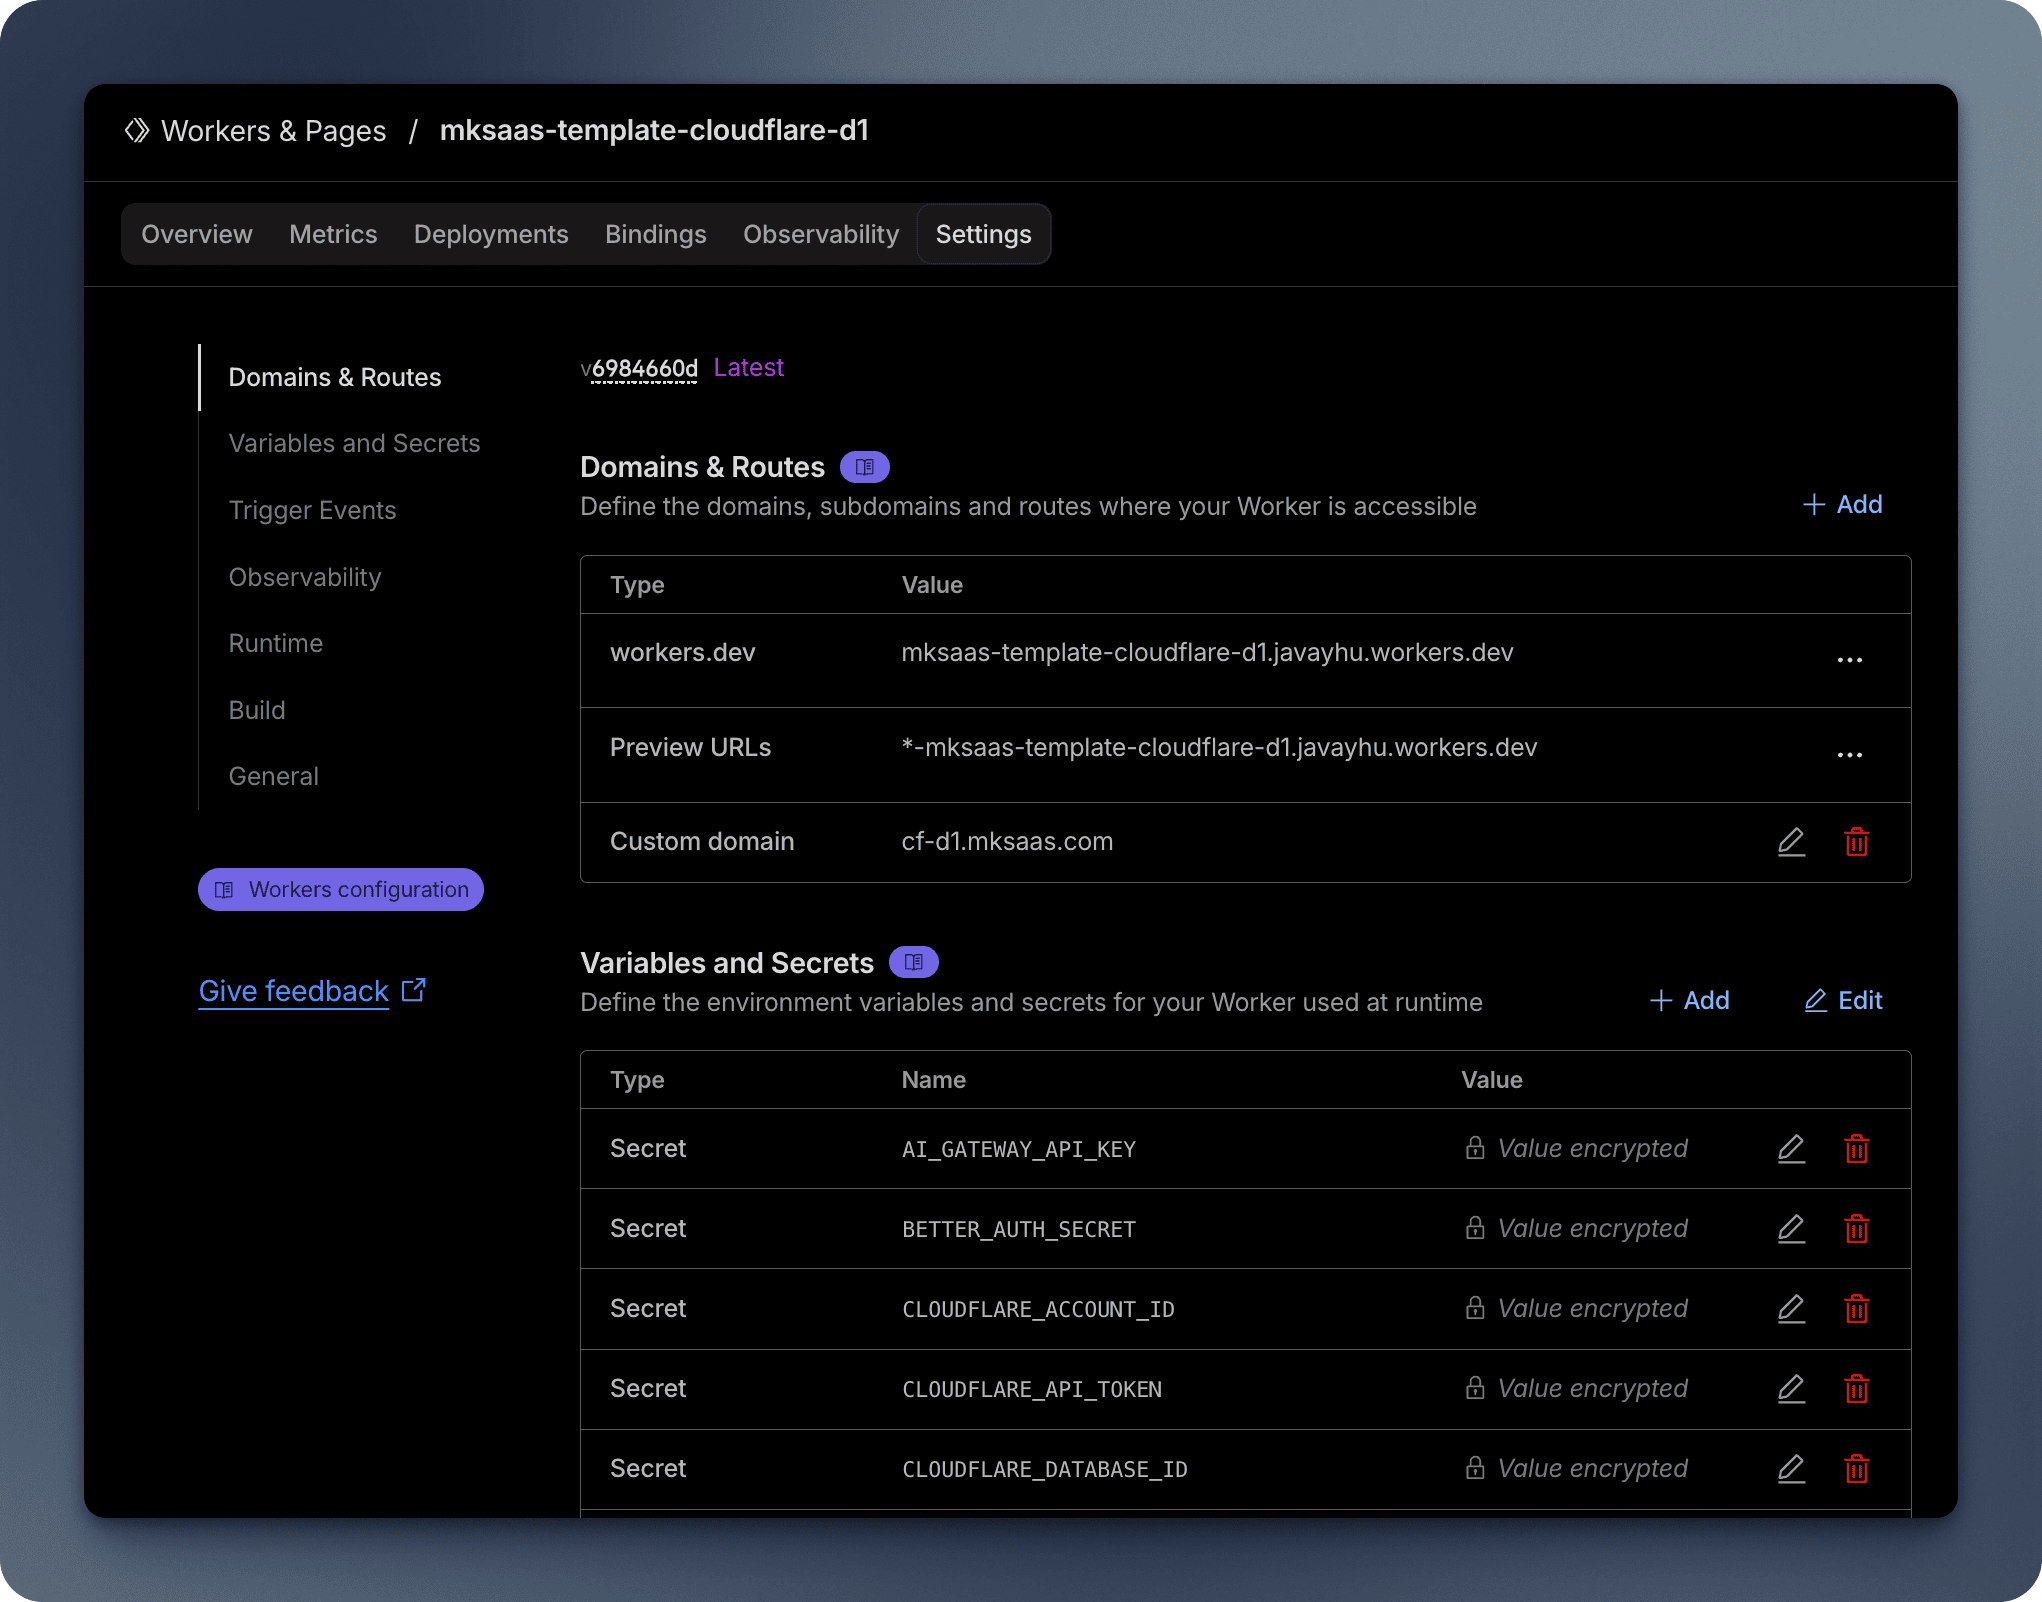
NEXT_PUBLIC_BASE_URL: the base URL for your application, set it tohttp://localhost:8787instead ofhttp://localhost:3000for local development, because your application will be run by opennext-cloudflare, which will automatically run on port8787by default.DATABASE_URL: when using D1 database, setDATABASE_URLto an empty stringDATABASE_URL=""CLOUDFLARE_ACCOUNT_ID: your Cloudflare account ID, which can be obtained from the Cloudflare Dashboard →Account Home→ click next to the account name → selectCopy account idCLOUDFLARE_DATABASE_ID: the ID of your created D1 database, which can be found in the Cloudflare Dashboard →Storage & Databases→D1 Databases→ copy the ID next to the database nameCLOUDFLARE_API_TOKEN: API token for database operations, which needs to be created inManage account→Account API tokens→ create a new API token with D1 database edit permissions and other permissions (as shown in the figure)
D1 database configuration example:
# For PostgreSQL(Supabase/Neon): Set DATABASE_URL and leave other D1 configuration empty
DATABASE_URL=""

# For Cloudflare D1: Leave DATABASE_URL empty and configure D1 bindings in wrangler.jsonc
CLOUDFLARE_ACCOUNT_ID="YOUR_ACCOUNT_ID_HERE"
CLOUDFLARE_DATABASE_ID="YOUR_DATABASE_ID_HERE"
CLOUDFLARE_API_TOKEN="YOUR_API_TOKEN_HERE"
Initialize Database
After the database is created, you need to run database migrations to initialize the database structure:
# generate database migration files
pnpm db:generate

# initialize local database
pnpm db:migrate

# initialize remote database
pnpm db:migrate:prod

# open local database studio to view database
pnpm db:studio

# open remote database studio to view database
pnpm db:studio:prod
This command will create all necessary tables and structures according to your Drizzle ORM schema.
1、If there is no D1 database file locally, it will be automatically created when executing the pnpm db:migrate:local command, and saved in the .wrangler/state/v3/d1 directory.
2、When executing the pnpm db:migrate command, it will connect to the remote database and execute the database migration operation, and the migration script is saved in the ./src/db/migrations directory.
3、By executing the pnpm db:studio:local and pnpm db:studio commands, you can open the local and remote database studio to view the data in the database.
Generate types
After configuring .env and wrangler.jsonc files, generate Cloudflare-specific types:
pnpm run cf-typegenThis command will automatically generate the cloudflare-env.d.ts file containing type definitions for the Cloudflare Worker runtime environment.
Create a Cloudflare Worker Project
- Go to the Cloudflare Dashboard
- Navigate to
Compute & AI→Workers and Pages→Create→Import a repository - Select your repository (use the
mainbranch by default) - Configure the build settings:
- Name: keep the name the same as the
nameinwrangler.jsoncfile - Build command: Leave empty
- Deploy command:
pnpm run deploy - Root directory: Leave as default
- Build Environment Variables: add
NEXT_PUBLIC_BASE_URLvariable, and set it tohttps://<your-project-name>.<account>.workers.devor your custom domain
- Name: keep the name the same as the
Configure Environment Variables
There are two ways to configure environment variables in Cloudflare Worker:
- Configure the environment variables in Cloudflare Worker Dashboard
- Go to the
Settings→Variables and Secrets - Click
+ Add, and add all the environment variables in production environment - Click
Deployto save the variables and trigger a build and deployment
- Configure the environment variables with Wrangler CLI
Create a new .env.production file in your project root directory, and copy the environment variables in .env file to it:
# Copy the .env file to .env.production
cp .env .env.production

# Update the environment variables in .env.production
# For example, you need to update the NEXT_PUBLIC_BASE_URL environment variable
# Note: When using D1 database, DATABASE_URL should remain an empty string

# Set the environment variables in Cloudflare Worker with Wrangler CLI
# https://developers.cloudflare.com/workers/wrangler/commands/#secret-bulk
# 1、If you only need to add a new environment variable, such as NEXT_PUBLIC_DEMO_WEBSITE, you can execute the following command
# echo true | wrangler secret put NEXT_PUBLIC_DEMO_WEBSITE
# 2、If you need to set multiple environment variables at once, such as quickly setting all environment variables in the .env.production file, you can execute the following command
wrangler secret bulk .env.production
If there are issues running online after deployment, such as registration or login failure, you can check the build logs on Cloudflare to see if it prompts missing environment variables.
If there are missing environment variables, you can check the Worker runtime and build time environment variables in the settings, and then trigger a build again.
Deploy Your Application
You can deploy your application in two ways:
Option 1: Automatic Deployment
- Push your changes to the
mainbranch (mainbranch is the default branch) - Cloudflare will automatically trigger a build and deployment
Option 2: Manual Deployment
-
Deploy directly from your local machine:
pnpm run deploy
Set up custom domains
After successful deployment, your application will be available at auto-generated domain. You can:
- Set up custom domains, and Cloudflare will automatically create the DNS records for you
- Monitor your application in the Cloudflare Dashboard, like the Traffic and Logs
Best Practices
-
Use
pnpm run devfor Local DevelopmentFor local development, prioritize using the
pnpm run devcommand as it allows for faster development and debugging of your Next.js application. In this mode, code changes are reflected quickly with hot reload. If you usepnpm run preview, the project will be built first and run in production mode, meaning code changes require runningpnpm run previewagain to take effect.If your application works normally locally with
pnpm run devbut behaves abnormally in production, check the production logs to analyze the issue. If production logs are hard to access, you can runpnpm run previewlocally to debug the issue in a production-like environment.Please check out the OpenNext.js Cloudflare | Develop & Deploy for more details.
-
Use different D1 databases for local development and production
You should use different D1 databases for local development and production. Wrangler will automatically create a local D1 database for development, and production uses the D1 database you created in the Cloudflare Dashboard. This ensures separation between development and production data, avoiding data confusion.
Please check out the Cloudflare D1 Documentation for more details.
-
Enable Worker Logs for Debugging
By default, MkSaaS template has already enabled Observability in
wrangler.jsonc. You can enable Worker logs in your project settings under the Observability section. This may require creating a new R2 storage bucket to save log data - simply follow the guided setup process on the dashboard. Once successfully enabled, you can view your application's runtime logs in the Logs tab.Please check out the Cloudflare Wrangler Configuration for more details.
FAQ
-
Build Size Too Large: If your Worker exceeds the size limit, consider:
- Upgrading to the Workers Paid plan
- Optimizing your bundle size
- Removing unnecessary dependencies
-
Database Connection Issues: Ensure your D1 database binding configuration is correct, and the database ID and binding name match the configuration in
wrangler.jsonc. If you encounter connection issues, check Worker logs for detailed error information. -
Environment Variable Issues: Make sure all environment variables are configured in both Worker runtime environments in Cloudflare.
-
Type Errors: Run
pnpm run cf-typesafter any Wrangler configuration changes to regenerate type definitions.
Reference
- Cloudflare Workers Documentation
- Cloudflare Wrangler Configuration
- Cloudflare D1 Documentation
- Cloudflare D1 Getting Started
- Cloudflare Workers Pricing
- OpenNext.js Cloudflare
- OpenNext.js Cloudflare | Develop & Deploy
- Drizzle | Connect to Cloudflare D1
Video Tutorial
Next Steps
Now that you understand how to deploy your website to Cloudflare Workers, explore these related topics: