Payment
Learn how to set up and use Stripe for handling payments and subscriptions
MkSaaS uses Stripe for payment management, and handles both one-time payments and recurring subscriptions with a flexible and developer-friendly approach.
Setup
MkSaaS boilerplate uses three price plans by default: Free plan, Pro subscription plan (monthly/yearly), and Lifetime plan (one-time payment), follow these steps to set up Stripe integration:
-
Create a Stripe account at stripe.com
-
Get your API keys from the Stripe dashboard:
- Go to the Stripe Dashboard >
Developers>API keys - Copy your Secret key (note: starts with
sk_test_for test mode orsk_live_for live mode) - Save it to your
.envfile asSTRIPE_SECRET_KEY
- Go to the Stripe Dashboard >
-
Set up Webhook and get your Webhook Secret:
- Go to the Stripe Dashboard >
Developers>Webhooks - Click
Add endpoint - Enter Webhook URL:
https://=YOUR-DOMAIN.com/api/webhooks/stripe - Select the events to listen for:
invoice.paidcheckout.session.completedcustomer.subscription.createdcustomer.subscription.updatedcustomer.subscription.deleted
- Click
Revealto view Webhook Signing Secret (starts withwhsec_) - Save it to your
.envfile asSTRIPE_WEBHOOK_SECRET
- Go to the Stripe Dashboard >
You can find more information in Webhooks section if you want to test payment in development environment.
-
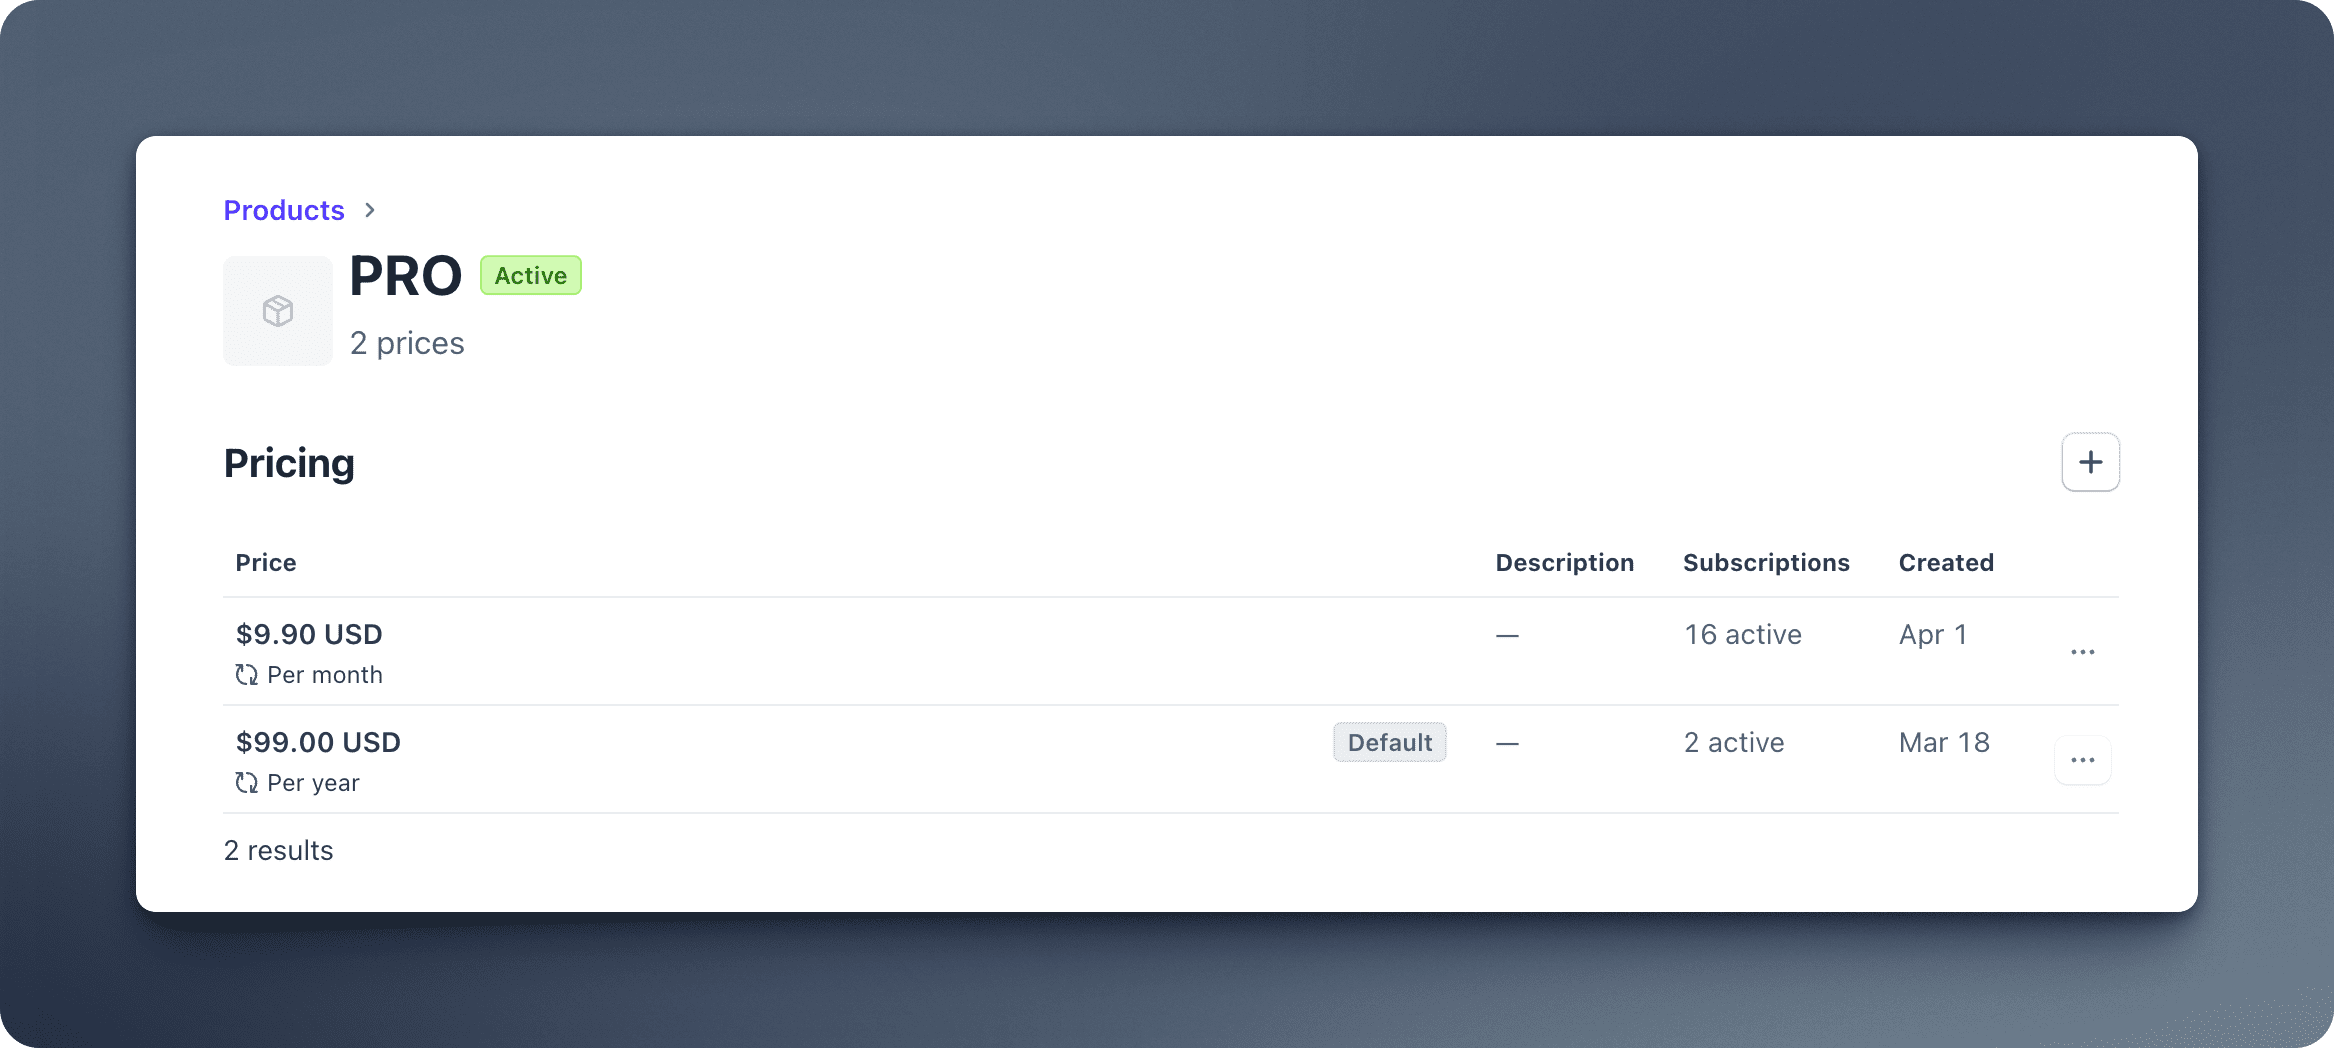
Create products and pricing plans in Stripe:
- Go to the Stripe Dashboard >
Product Catalog - Create Pro subscription product:
- Click
Add product - Name:
Pro Plan - Description:
Advanced features with subscription pricing - Add monthly price:
- Click
Add price - Price: $9.90 (currency select USD)
- Recurring: Monthly
- Save and copy the Price ID (starts with
price_), this will be used forNEXT_PUBLIC_STRIPE_PRICE_PRO_MONTHLY
- Click
- Add yearly price:
- Click
Add price - Price: $99.00 (currency select USD)
- Recurring: Yearly
- Save and copy the Price ID (starts with
price_), this will be used forNEXT_PUBLIC_STRIPE_PRICE_PRO_YEARLY
- Click
- Click
- Create Lifetime product:
- Click
Add product - Name:
Lifetime Plan - Description:
One-time payment for lifetime access - Add a price:
- Price: $199.00 (currency select USD)
- Type: One-off
- Save and copy the Price ID (starts with
price_), this will be used forNEXT_PUBLIC_STRIPE_PRICE_LIFETIME
- Click
- Go to the Stripe Dashboard >
- Add the following environment variables:
STRIPE_SECRET_KEY=sk_test_...
STRIPE_WEBHOOK_SECRET=whsec_...

# Price plans
NEXT_PUBLIC_STRIPE_PRICE_PRO_MONTHLY=price_...
NEXT_PUBLIC_STRIPE_PRICE_PRO_YEARLY=price_...
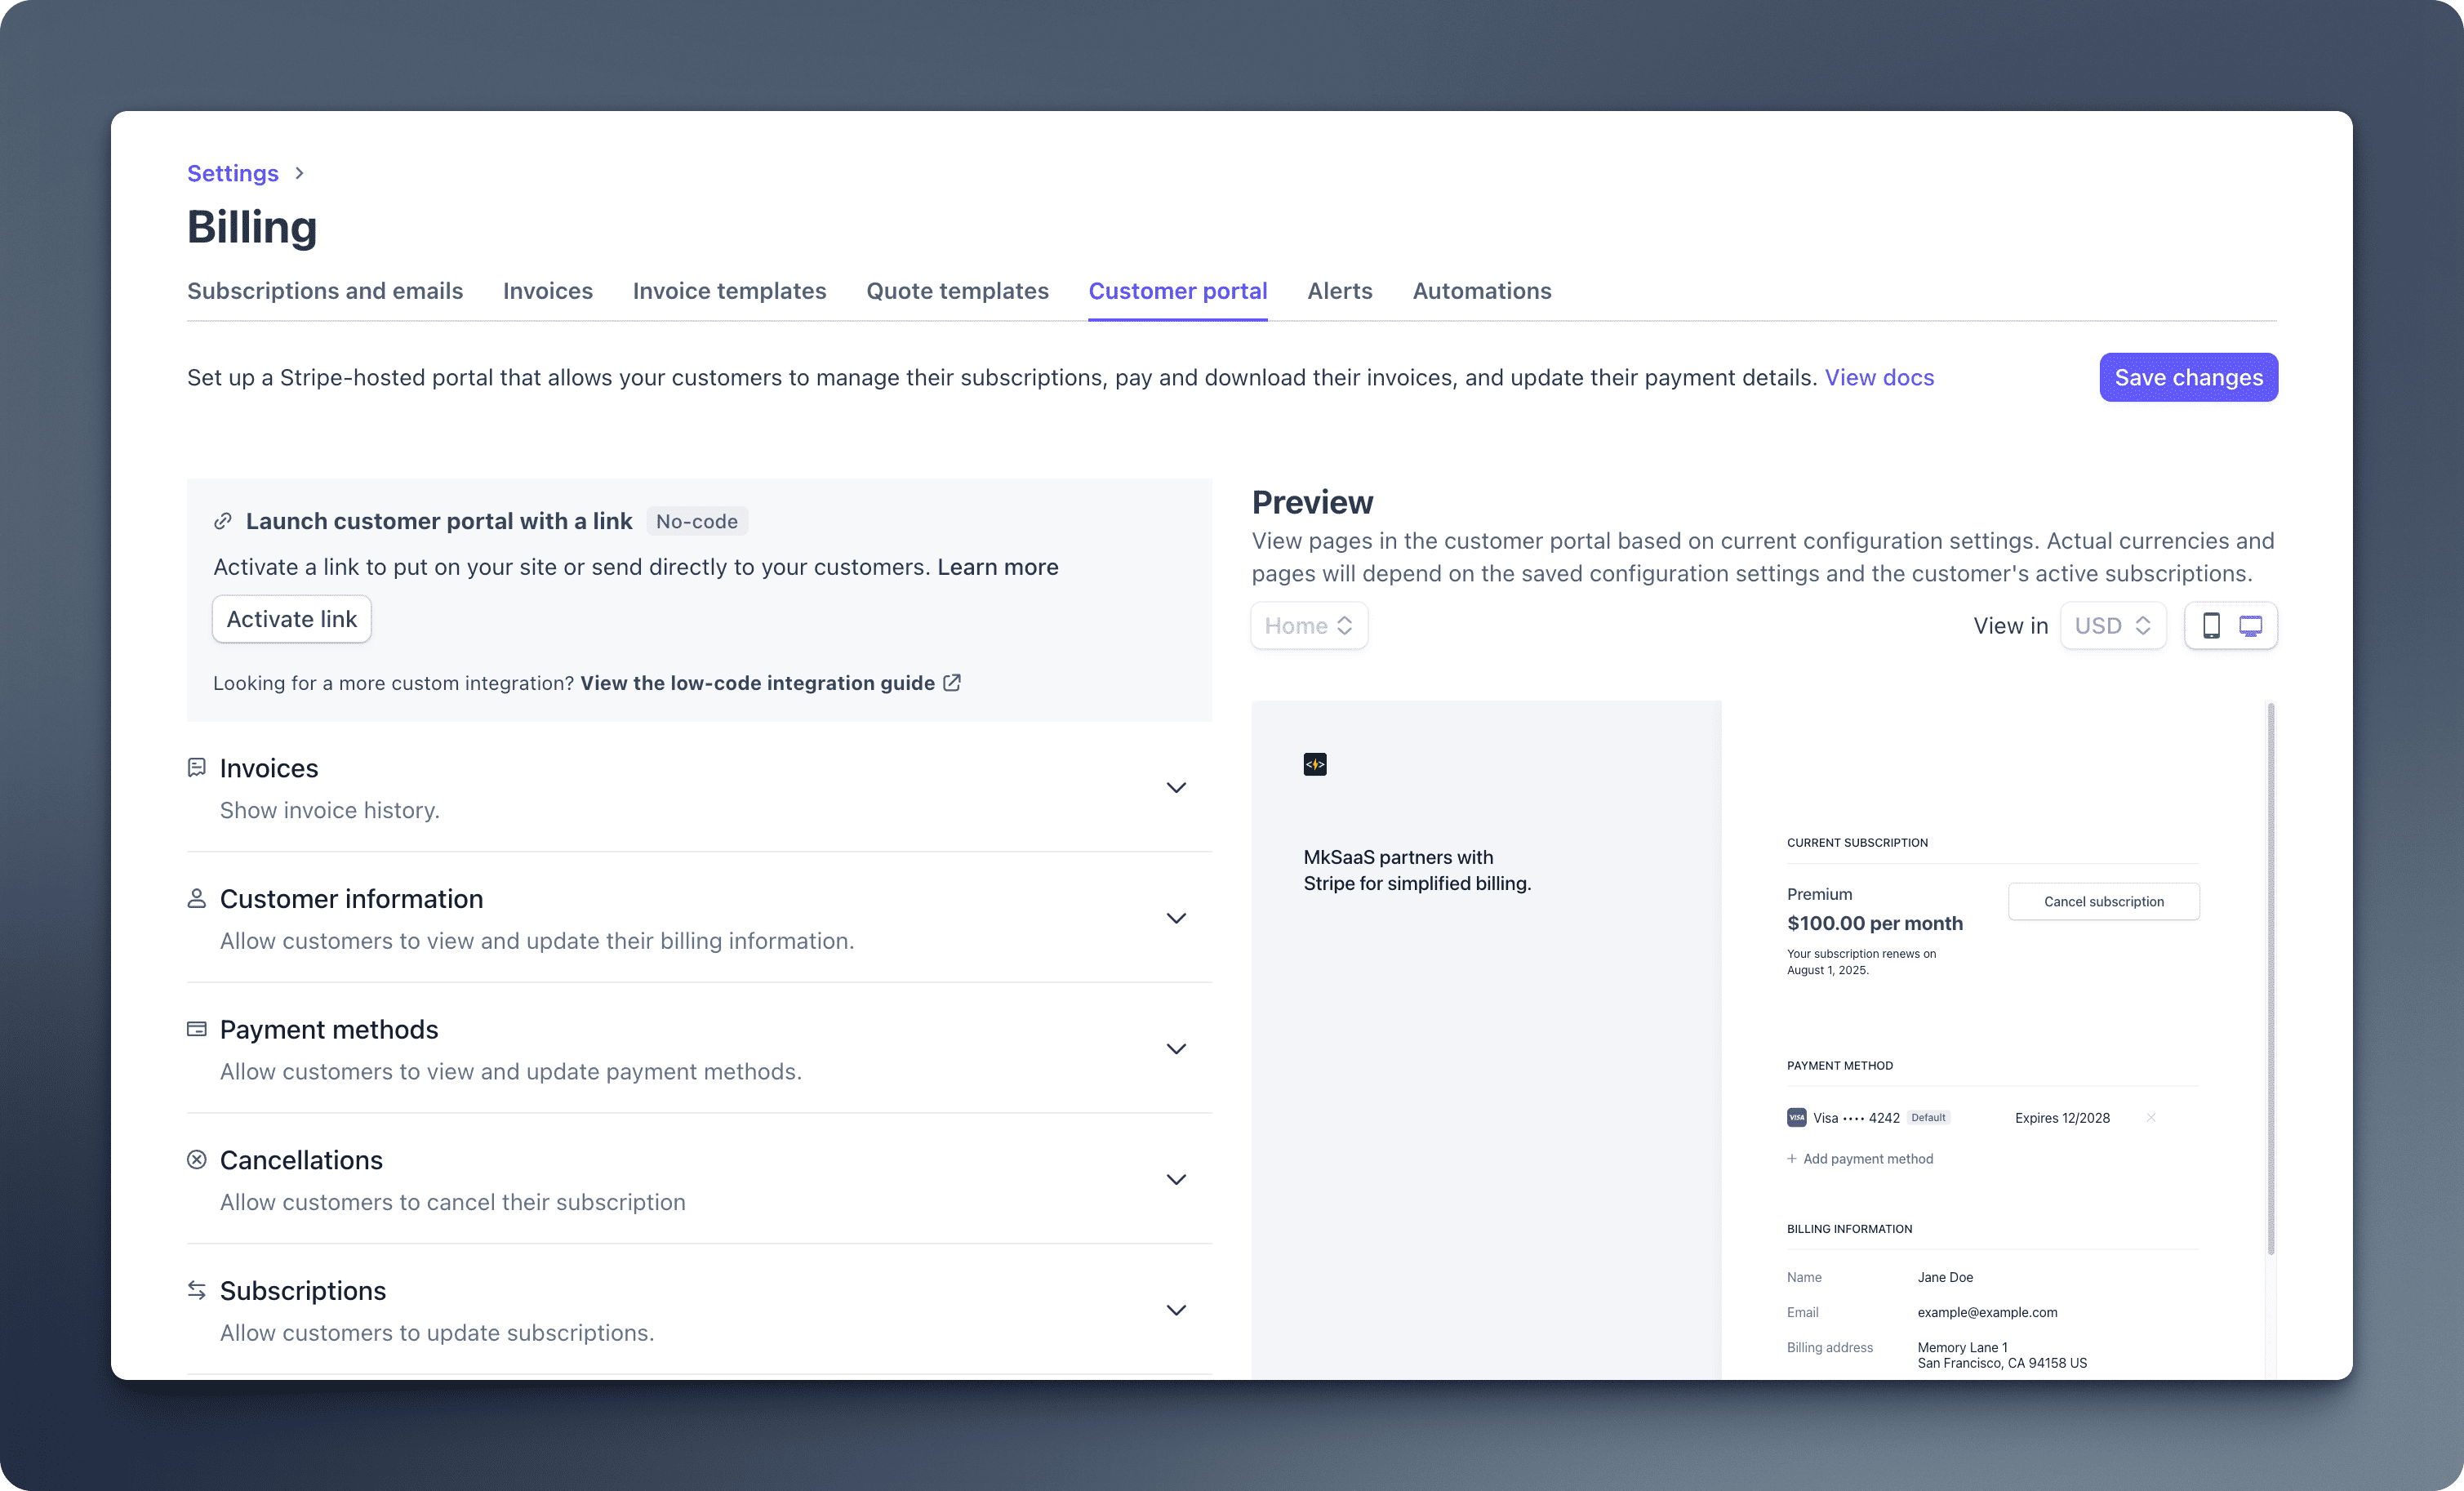
NEXT_PUBLIC_STRIPE_PRICE_LIFETIME=price_...- Set up the Stripe Customer Portal:
- Go to the Stripe Dashboard >
Settings>Billing>Customer Portal - Customize the content of the customer portal, for example, you can add a custom logo and title
- Click
Save changesto save the portal configuration
- Update the
website.tsxfile to use Stripe as the payment provider in the payment configuration, and configure your pricing plans in the price configuration:
import { PaymentTypes, PlanIntervals } from '@/payment/types';

export const websiteConfig = {
  // ...other config
  payment: {
    provider: 'stripe', // Payment provider to use
  },
  price: {
    plans: {
      free: {
        id: 'free',
        prices: [],
        isFree: true,
        isLifetime: false,
        credits: {
          enable: true,
          amount: 50,
          expireDays: 30,
        },
      },
      pro: {
        id: 'pro',
        prices: [
          {
            type: PaymentTypes.SUBSCRIPTION,
            priceId: process.env.NEXT_PUBLIC_STRIPE_PRICE_PRO_MONTHLY!,
            amount: 990,
            currency: 'USD',
            interval: PlanIntervals.MONTH,
          },
          {
            type: PaymentTypes.SUBSCRIPTION,
            priceId: process.env.NEXT_PUBLIC_STRIPE_PRICE_PRO_YEARLY!,
            amount: 9900,
            currency: 'USD',
            interval: PlanIntervals.YEAR,
          },
        ],
        isFree: false,
        isLifetime: false,
        popular: true,
        credits: {
          enable: true,
          amount: 1000,
          expireDays: 30,
        },
      },
      lifetime: {
        id: 'lifetime',
        prices: [
          {
            type: PaymentTypes.ONE_TIME,
            priceId: process.env.NEXT_PUBLIC_STRIPE_PRICE_LIFETIME!,
            amount: 19900,
            currency: 'USD',
            allowPromotionCode: true,
          },
        ],
        isFree: false,
        isLifetime: true,
        credits: {
          enable: true,
          amount: 1000,
          expireDays: 30,
        },
      },
    },
  },
  // ...other config
}
If you are setting up the environment, now you can go back to the Environment Setup guide and continue. The rest of this guide can be read later.
Environment Setup
Set up environment variables
Payment System Structure
The payment system in MkSaaS is designed with the following components:
This modular structure makes it easy to extend the payment system with new providers, pricing plans, and UI components.
Core Features
- One-time payments for lifetime access
- Recurring subscription payments (monthly/yearly)
- Customer portal integration for subscription management
- Webhook handling for payment events
- Subscription status tracking and verification
- Built-in pricing components (tables, cards, buttons)
- Server actions for secure payment operations
- React Hooks for payment state management
- Multiple pricing plans support (Free, Pro, Lifetime)
Usage
MkSaaS provides simple payment utilities for handling checkout sessions and customer portals:
import { createCheckout, createCustomerPortal } from '@/payment';

// Create a checkout session
const checkoutResult = await createCheckout({
  planId: 'pro',
  priceId: process.env.NEXT_PUBLIC_STRIPE_PRICE_PRO_MONTHLY!,
  customerEmail: 'user@example.com',
  successUrl: 'https://example.com/payment/success',
  cancelUrl: 'https://example.com/payment/cancel',
  metadata: { userId: 'user_123' },
});

// Redirect to checkout URL
window.location.href = checkoutResult.url;

// Create a customer portal session
const portalResult = await createCustomerPortal({
  customerId: 'cus_123',
  returnUrl: 'https://example.com/account/billing',
});

// Redirect to portal URL
window.location.href = portalResult.url;
Webhooks
Stripe Webhooks are essential for handling asynchronous events like successful payments and subscription updates.
Development
For local development, you can use the Stripe CLI to forward events to your local server:
pnpm install -g stripe/stripe-clinpm install -g stripe/stripe-cliyarn global add stripe/stripe-clibrew install stripe/stripe-cli/stripeLogin to Stripe:
stripe loginForward events to your local server:
stripe listen --forward-to localhost:3000/api/webhooks/stripeThe Webhook secret is printed in the terminal. Copy it and add it to your .env file:
STRIPE_WEBHOOK_SECRET=whsec_...You can trigger test events using the Stripe CLI, or test events on the website:
stripe trigger invoice.paid
stripe trigger checkout.session.completed
stripe trigger customer.subscription.created
stripe trigger customer.subscription.updated
stripe trigger customer.subscription.deleted
Production
- Go to the Stripe Dashboard > Developers > Webhooks
- Click
Add endpoint - Enter Webhook URL:
https://=YOUR-DOMAIN.com/api/webhooks/stripe - Select the events to listen for:
invoice.paidcheckout.session.completedcustomer.subscription.createdcustomer.subscription.updatedcustomer.subscription.deleted
- After creating, click
Revealto view your Webhook Signing Secret - Copy the Webhook secret (starts with
whsec_) and add it to your environment variables
UI Components
MkSaaS includes pre-built React components for handling payments:
Webhook Events
The payment system handles these Webhook events in handleWebhookEvent method:
public async handleWebhookEvent(payload: string, signature: string): Promise<void> {
  // Implementation to handle various Stripe webhook events:
  // - checkout.session.completed
  // - customer.subscription.created
  // - customer.subscription.updated
  // - customer.subscription.deleted
  // - invoice.paid
}
Customization
Creating a New Payment Provider
MkSaaS makes it easy to extend the payment system with new providers:
- Create a new file in the
src/payment/providerdirectory - Implement the
PaymentProviderinterface fromtypes.ts - Update the payment provider selection logic in
index.ts
Example implementation for a new provider:
import {
  PaymentProvider,
  CreateCheckoutParams,
  CheckoutResult,
  CreatePortalParams,
  PortalResult,
  Subscription,
  getSubscriptionsParams
} from '@/payment/types';

export class MyProvider implements PaymentProvider {
  constructor() {
    // Initialize your payment provider
  }

  public async createCheckout(params: CreateCheckoutParams): Promise<CheckoutResult> {
    // Implementation for creating a checkout session
  }

  public async createCustomerPortal(params: CreatePortalParams): Promise<PortalResult> {
    // Implementation for creating a customer portal
  }

  public async handleWebhookEvent(payload: string, signature: string): Promise<void> {
    // Implementation for handling webhook events
  }
}
Then update the payment provider selection in index.ts:
import { MyProvider } from './provider/my-provider';

export const initializePaymentProvider = (): PaymentProvider => {
  if (!paymentProvider) {
    if (websiteConfig.payment.provider === 'stripe') {
      paymentProvider = new StripeProvider();
    } else if (websiteConfig.payment.provider === 'my-provider') {
      paymentProvider = new MyProvider();
    } else {
      throw new Error(
        `Unsupported payment provider: ${websiteConfig.payment.provider}`
      );
    }
  }

  return paymentProvider;
};
Testing Cards
For testing Stripe integration, use Stripe's test mode and test credit cards:
- 4242 4242 4242 4242 - Successful payment
- 4000 0000 0000 3220 - 3D Secure authentication required
- 4000 0000 0000 9995 - Insufficient funds failure
You can find more information about Stripe test cards in the Stripe documentation.
Invoices
MkSaaS has already configured the invoice creation for one-time payments.
// Automatically create an invoice for the one-time payment
checkoutParams.invoice_creation = {
  enabled: true,
};
If you want to automatically send paid invoices, you can enable it in your Customer emails settings, under Email customers about, select Successful payments. After that, you can access the invoices in the Stripe Dashboard > Invoices.

You can find more information about Automatically send paid invoices in the Stripe documentation.
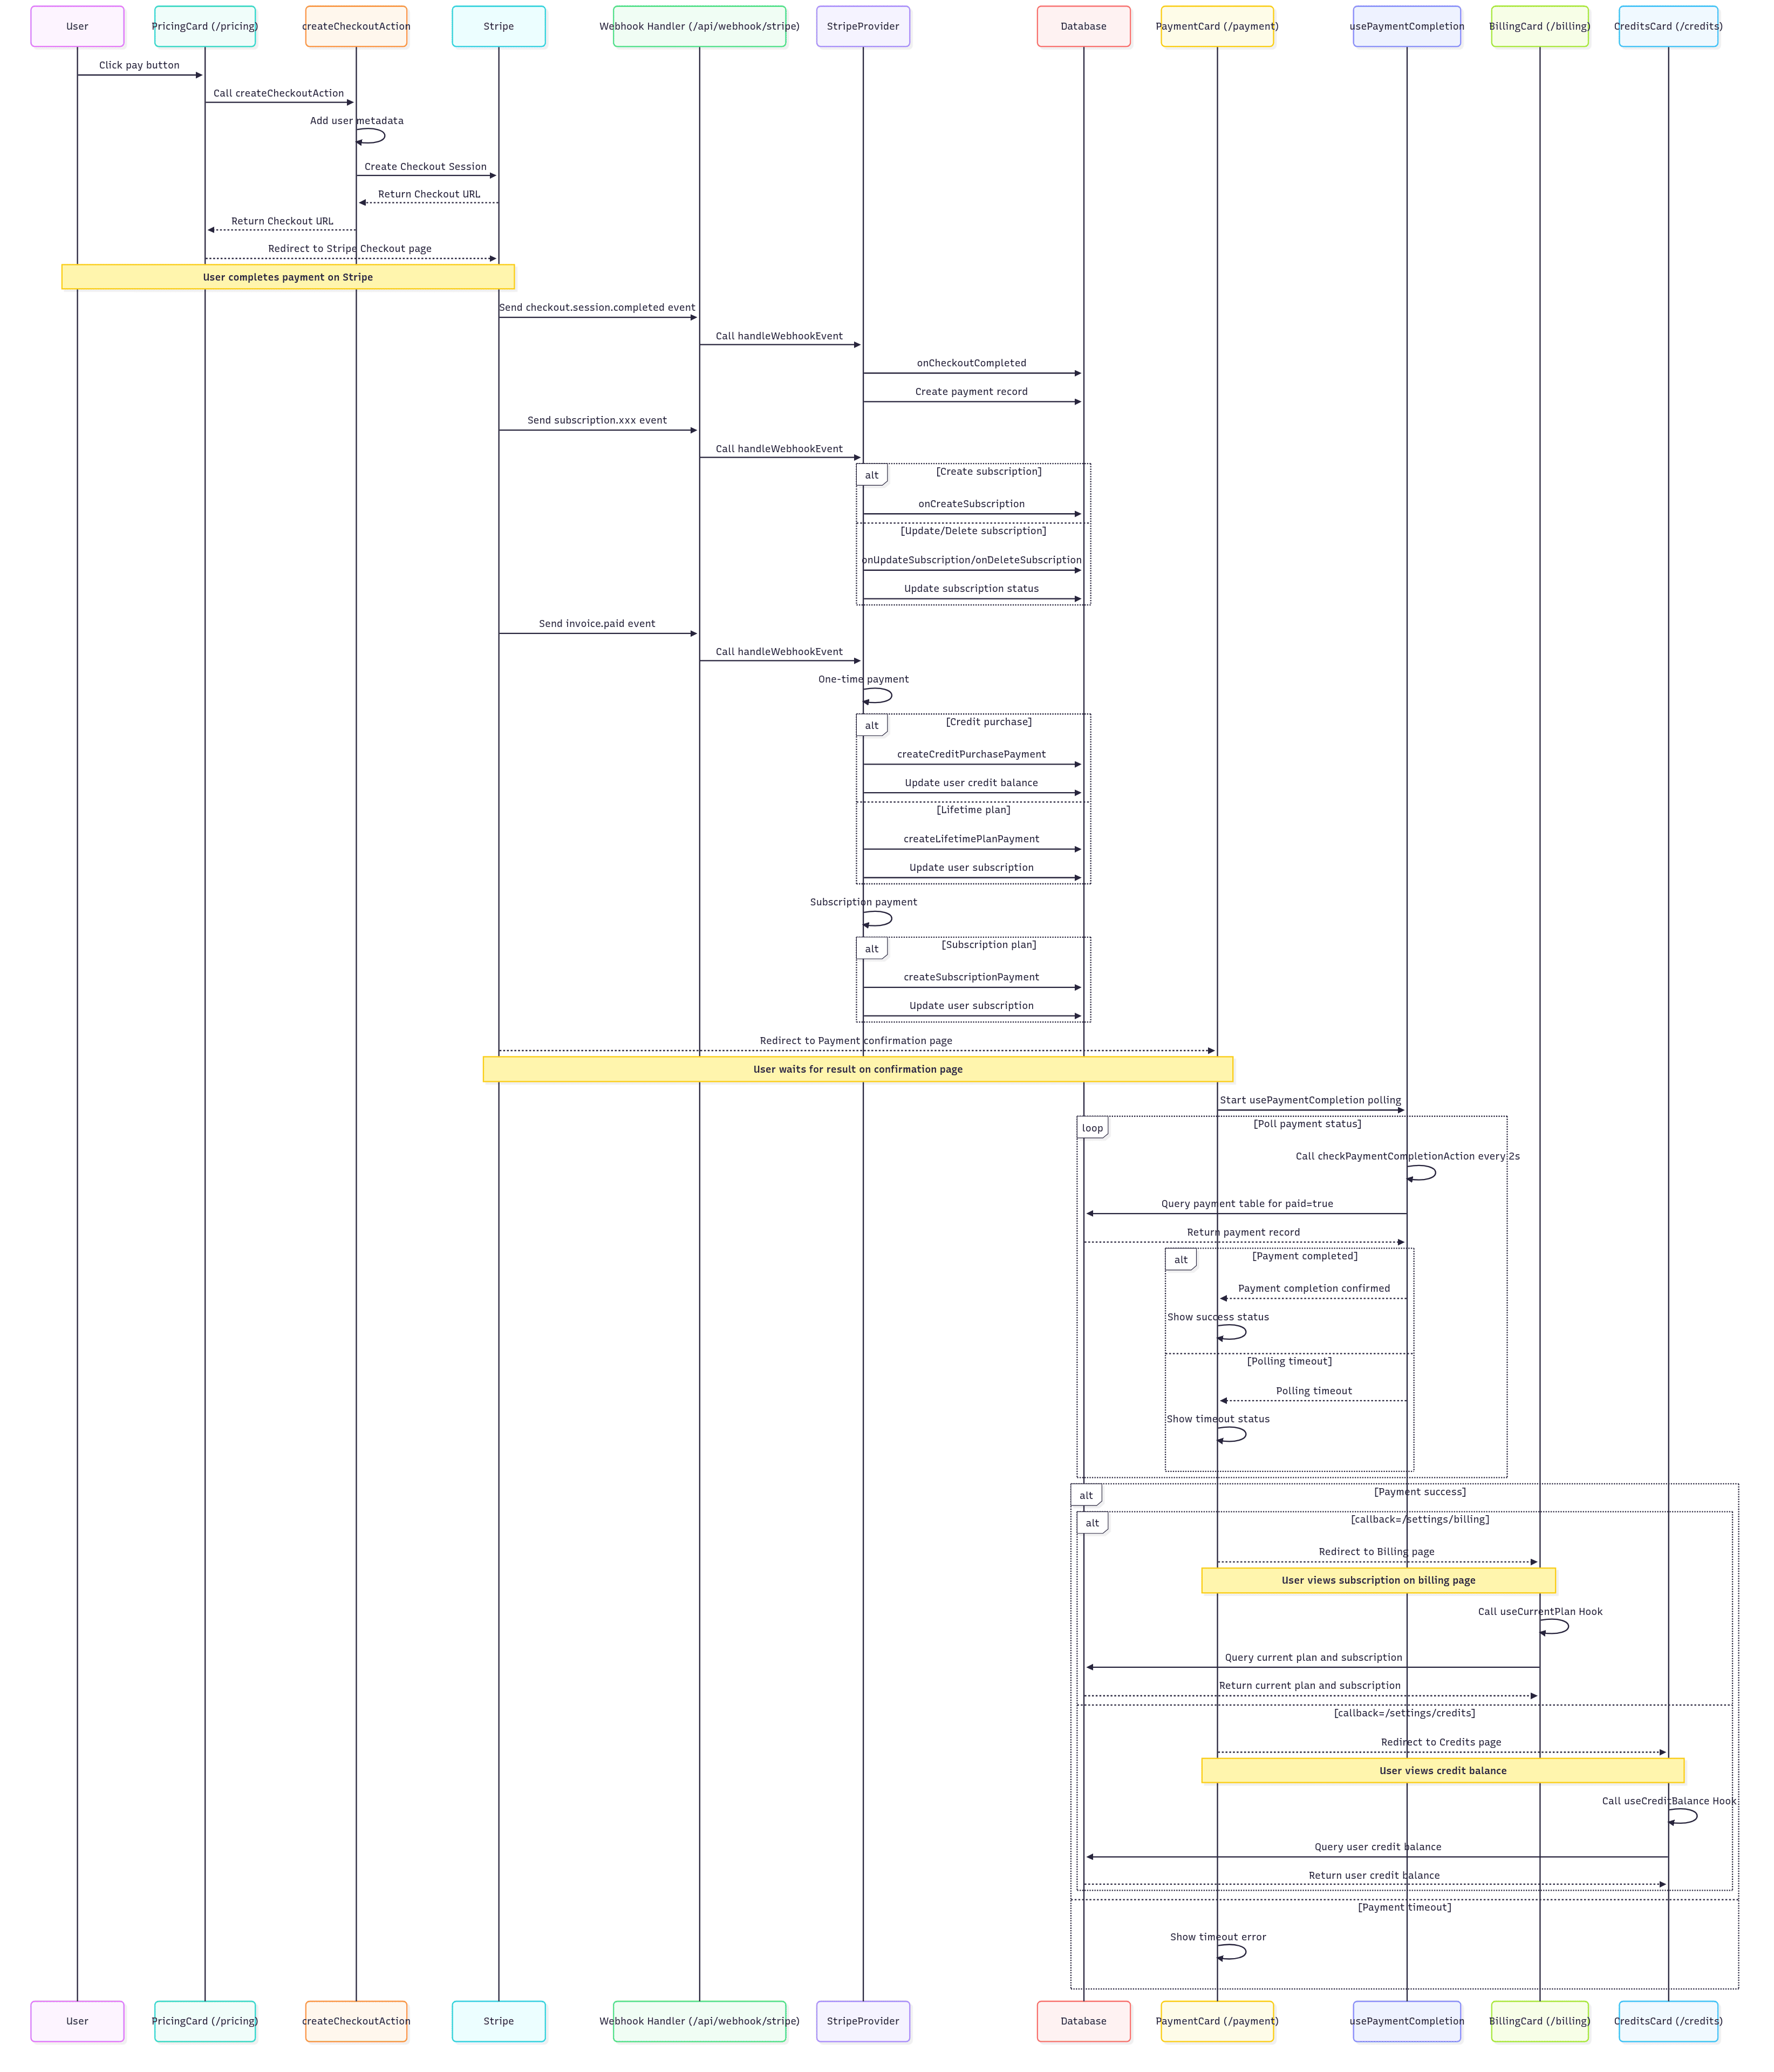
Diagram
This is the diagram of the payment process, you can watch the video tutorial for more details.
FAQ
How to activate WeChatPay and Alipay?
You can activate WeChatPay and Alipay in the Stripe Dashboard > Settings > Payment methods. You can find more information about WeChat Pay and Alipay in the Stripe documentation.

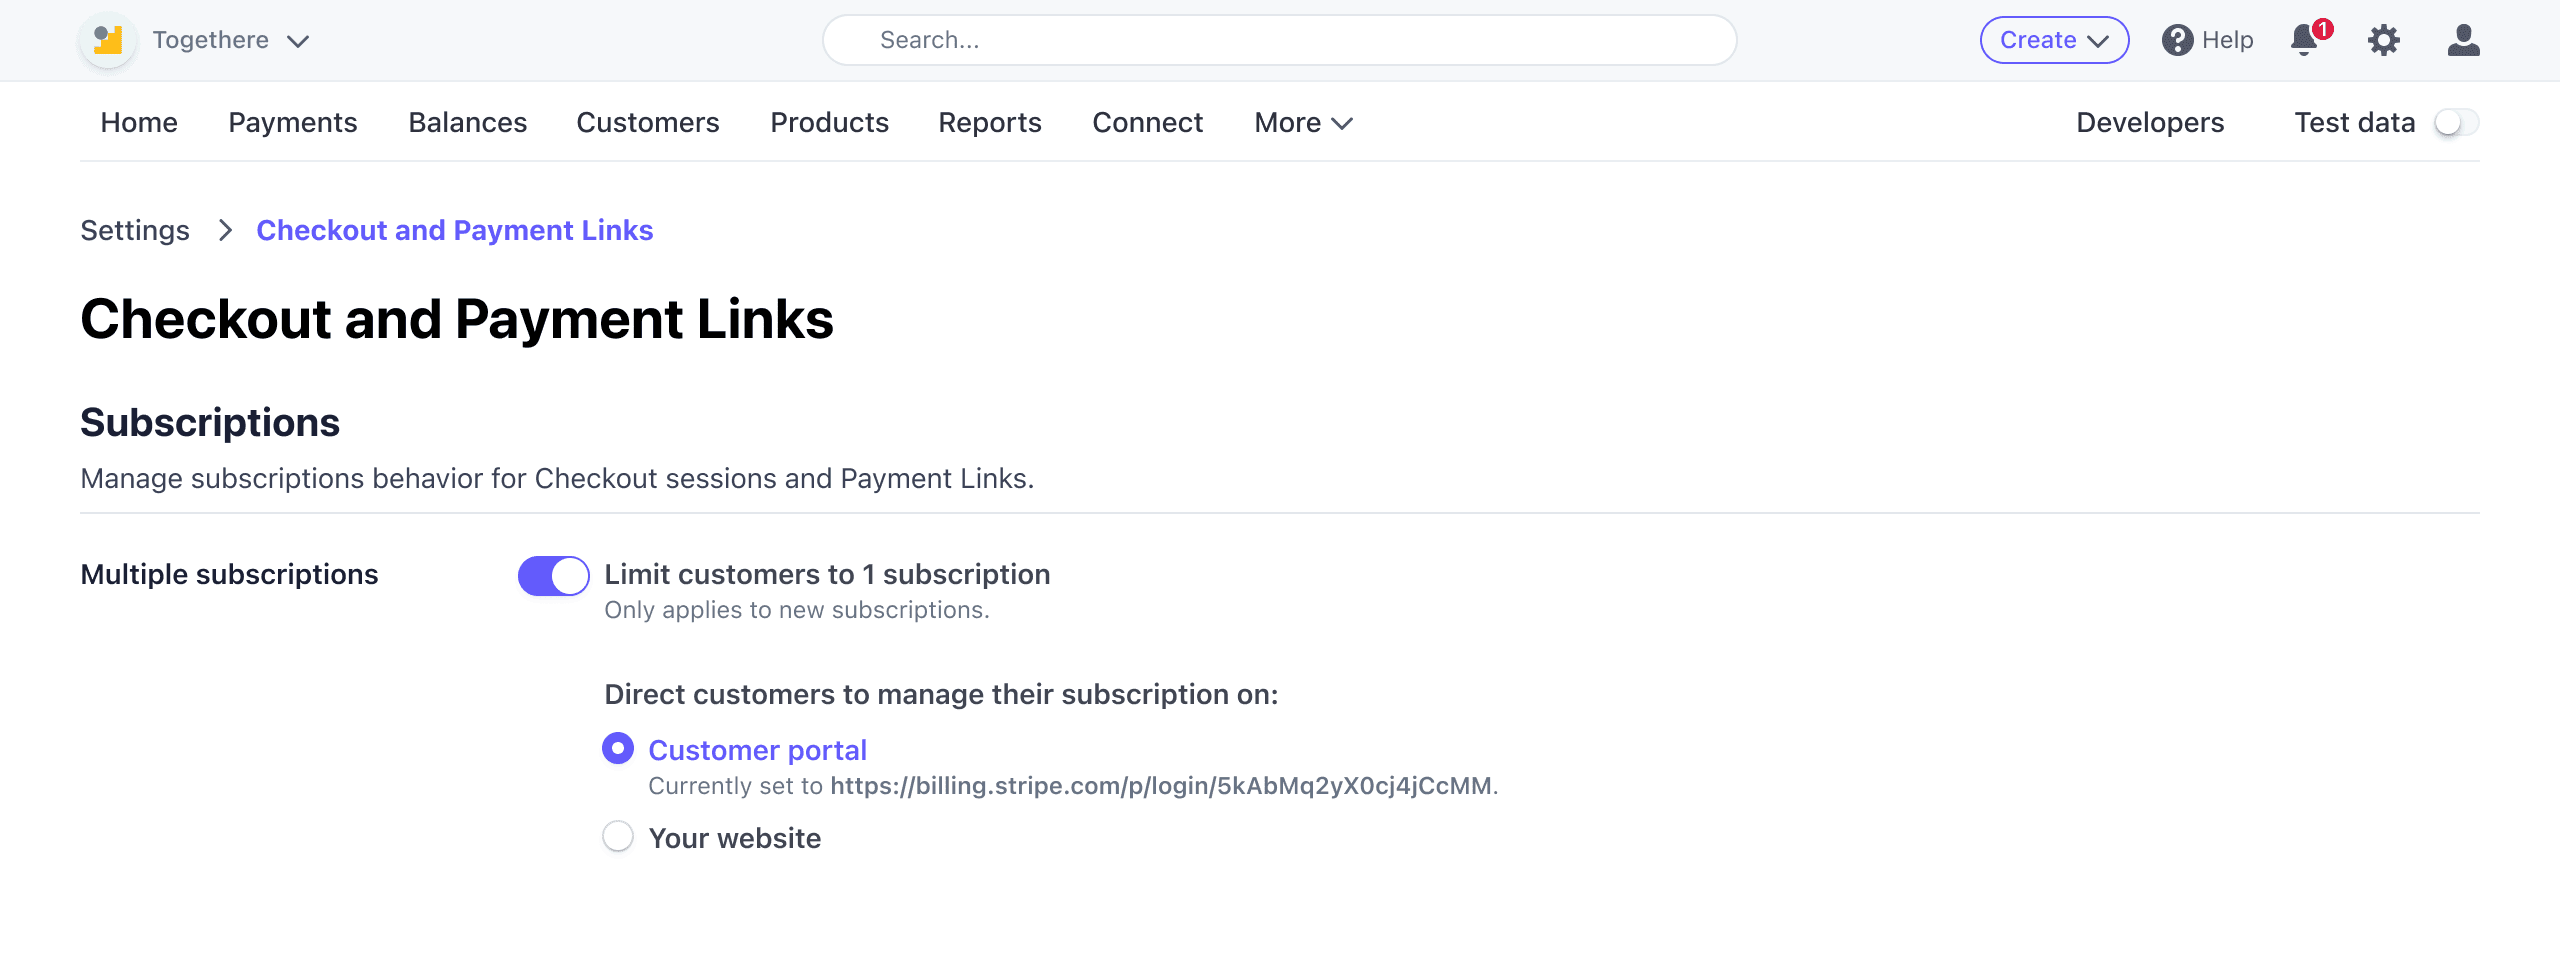
How to limit users to only one subscription?
You can enable Limit customers to 1 subscription in the Stripe Dashboard > Settings > Checkout and Payment Links > Subscriptions. You can find more information about Limit customers to one subscription in the Stripe documentation.
Best Practices
- Secure API Keys: Never expose your Stripe secret key in client-side code
- Validate Webhook Signatures: Always validate the signature of Webhook events
- Handle Errors Gracefully: Provide user-friendly error messages when payments fail
- Test Webhooks Thoroughly: Ensure all Webhook events are properly handled
Video Tutorial
Reference
Next Steps
Now that you understand how to work with payments in MkSaaS, explore these related integrations:
 MkSaaS Docs